Static Sites Really Fast
Making a static site really fast
ByContents
A static website is a website whose contents are basic HTML, CSS, and JS—hand-written or generated from more code. These files can then be served over many services directly without having to run a special type of server—they just need to be able to serve files. This makes them the easiest way to host websites as long as the content on the site doesn’t change constantly.
For learning web development, I believe making a site in this way is one of the fastest ways to get something you’ve made out there.
To create a static website, you first need to make your website’s files and then host them somewhere online.
Making the Website
To start out, you don’t really need a framework or otherwise—Just some basic HTML. We start out in our project’s
directory with a file called index.html so it will be loaded to the base path of the URL.
(empty file right now)If you’re using a modern code editor with completions from Emmet you can get the basic outline with
a code snippet expanded from html:5. You should also have a formatter on hand for this process to keep things tidy. I
use Prettier as it’s widely used and doesn’t need configuration to work well.
Below is the snippet provided by Emmet and cleaned up by Prettier:
<!doctype html><html lang="en"> <head> <meta charset="UTF-8" /> <meta name="viewport" content="width=device-width, initial-scale=1.0" /> <title>Document</title> </head> <body></body></html>With this template, you can add some semantic HTML and some placeholder content. I usually add in Pico CSS just to get
things looking good to start, so I’ve added the classless basic version in the <head>.
<!doctype html><html lang="en"> <head> <meta charset="UTF-8" /> <meta name="viewport" content="width=device-width, initial-scale=1.0" /> <title>I'm the best</title> <link rel="stylesheet" href="https://cdn.jsdelivr.net/npm/@picocss/pico@2/css/pico.classless.min.css" /> </head> <body> <main> <article> <h1>I'm the best</h1> <p>It's simply well known</p> </article> </main> <footer> <p>Made by me, the best</p> </footer> </body></html>Now you’re ready to host it online!
Hosting it Online
Hosting a static website can be done through many sources for free or through paid services to get servers for you. Unfortunately for our objective, these aren’t very fast to set up and you’re unlikely to have an account on some web hosting service if you’re making a website for the first time.
As we want to get this hosted fast, we can use something very fast or very widespread in the forms of Surge or GitHub Pages. They both have a few trade-offs as listed here for brevity:
- Surge
- Just need an email
- All from the command line
- Must manually republish
- Default URL is
[custom-name-here].surge.sh
- GitHub Pages
- Requires a GitHub account (you probably have one)
- Additional step to configure the repository on GitHub
- Automatically republishes on Git push
- Default URL is
[your-github-username].github.io; the base domain or a subdomain of it.- The repository
test/cool-websitewill be hosted attest.github.io/cool-website - The repository
test/test.github.iowill be hosted attest.github.io
- The repository
For the main section of this guide, we will use Surge to just get the site up fast. Afterwards, we will go back and host over GitHub Pages for open source sites you want to redeploy as you commit updates.
Hosting over Surge
To host over surge, you need to use the Surge CLI. Using NPM you can either install it globally
or run it via npx.
# Install globallynpm install --global surge# Runsurge
# Run directlynpx surge
With either of these methods, run the Surge CLI in your project’s directory, then follow the prompts. You did it! Whenever you want to update your website, just run your Surge command and use the same URL.
You can see an example website at unadvised-chance.surge.sh and its extremely minimal code at my GitHub repository.
For a more detailed guide, you can check out the Surge Docs on this topic.
Hosting over GitHub Pages
To host over GitHub Pages, you need a GitHub account and Git. To use GitHub pages without the ‘Pro’ subscription, your
repository will need to be public. Additionally, the default for using a repository that isn’t named in the format of
[your-github-username].github.io will be deployed as a subdomain under that URL.
To start, initialize a Git repository in your project folder and commit everything.
git initgit add -agit commit -m "Initial Commit"Next, create a new repository on GitHub. I would recommend to not add anything as it will show you how to push your files if you don’t have files in the repository.
If you added any options, you will have to manually type:
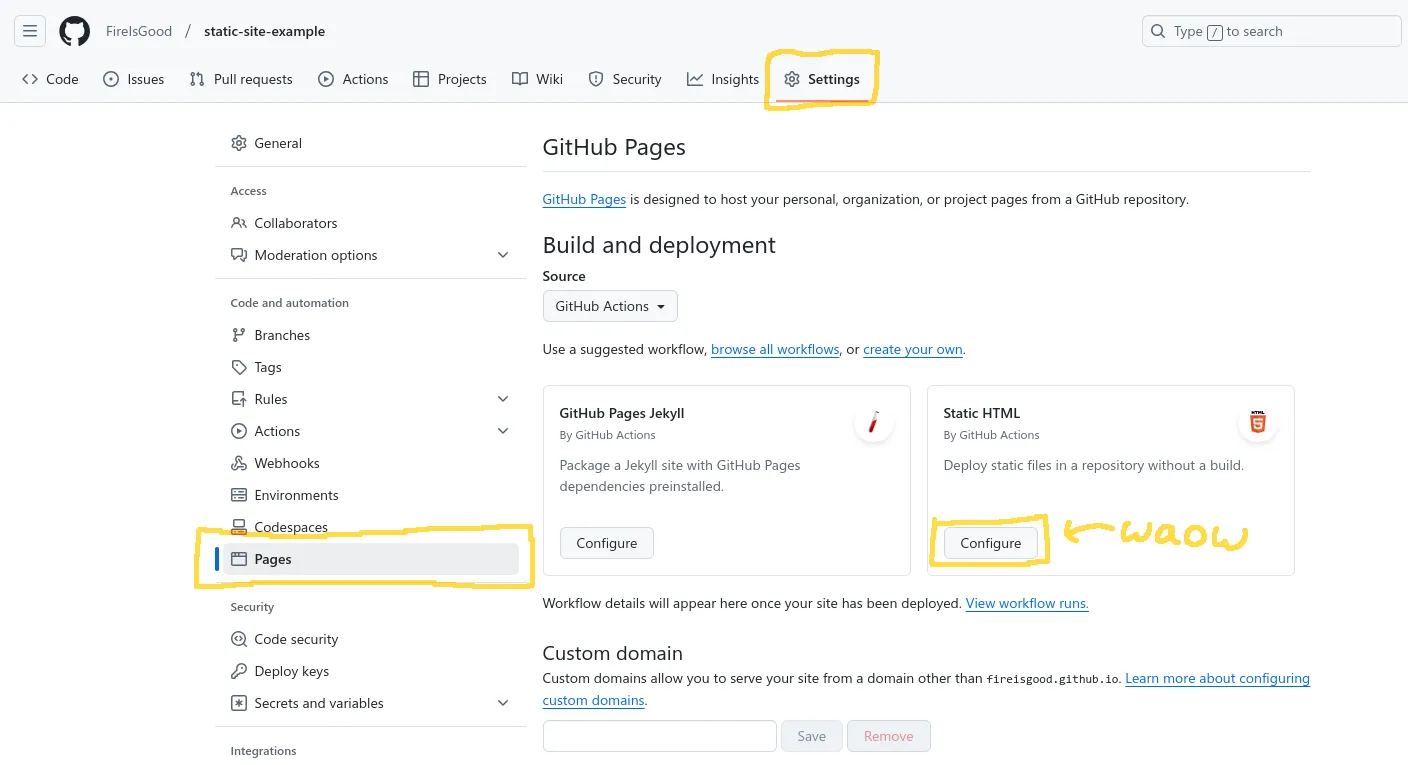
git remote add origin https://github.com/[your-username]/[repository-name].gitgit branch -M maingit push -u origin mainNow, navigate to the GitHub repository online and go to the Settings tab and then Code and automation -> Pages. Change the “Source” option to GitHub Actions and click “Configure” on the Static HTML option. Click Commit Changes, rename the commit if you want, and click Confirm.

This adds a file at .github/workflows/static.yml which will redeploy your site whenever changes are pushed to main. If
you ever need to change anything about this, you can find it in that file. Your site should now be up within a few
seconds!
Final Touches
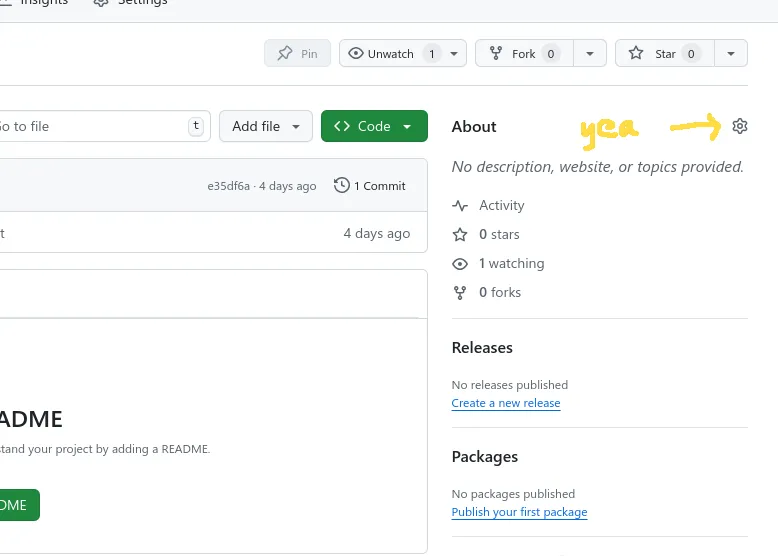
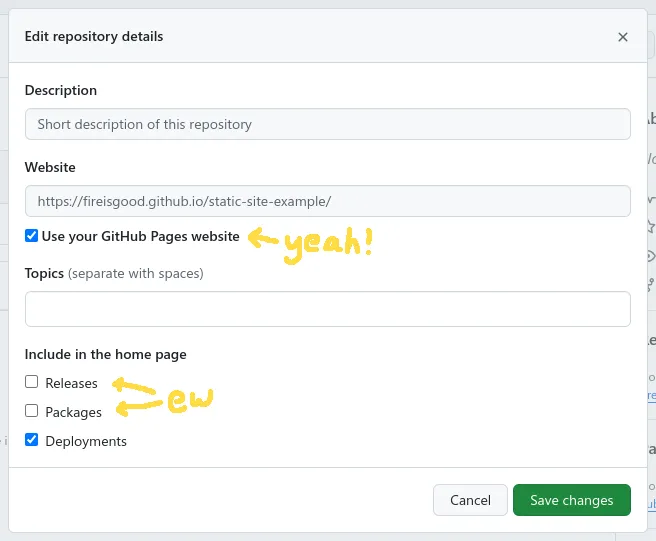
For some final touches, you can make the GitHub page link directly to your new site instead of having users find it under Deployments. To do this, navigate to the top right gear icon to open the settings.

Then, check the Use your GitHub Pages website. While you’re there, you can also uncheck the Releases and Packages options to clean up the side bar.

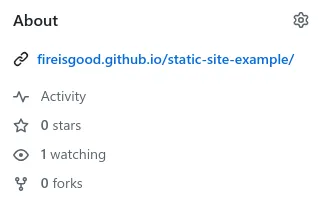
After you save your changes, the link to your site should appear under the About header.

Whenever you want to update your website, just push local Git changes to your main branch. As with the initial deployment, changes should appear live on the site within seconds!
You can see my example at fireisgood.github.io/static-site-example and its moderately minimal code at my GitHub repository.
For a more detailed guide, you can check out the GitHub Pages Docs on this topic.
Conclusion
It’s really that simple.
If you want to continue refining your site by adding a custom domain or a better site in general, find some other article, I’m not going to explain it here.
Further Research
There are other hosts such as Netlify, Vercel, or Digital Ocean with nice free tiers for static hosting. For more information on those, you can check out Free For Dev page on Web Hosting.
You could also run your static site on a Virtual Private Server service or host it yourself if you wanted more control on the backend. Services like Hostinger, Digital Ocean, and many others can be found for this purpose.